

A Web-Based Framework for Creating Immersive Analytics Experiences
Try it in your browser: https://vriajs.github.io/vria
- What is VRIA?
- Basic usage
- VRIA
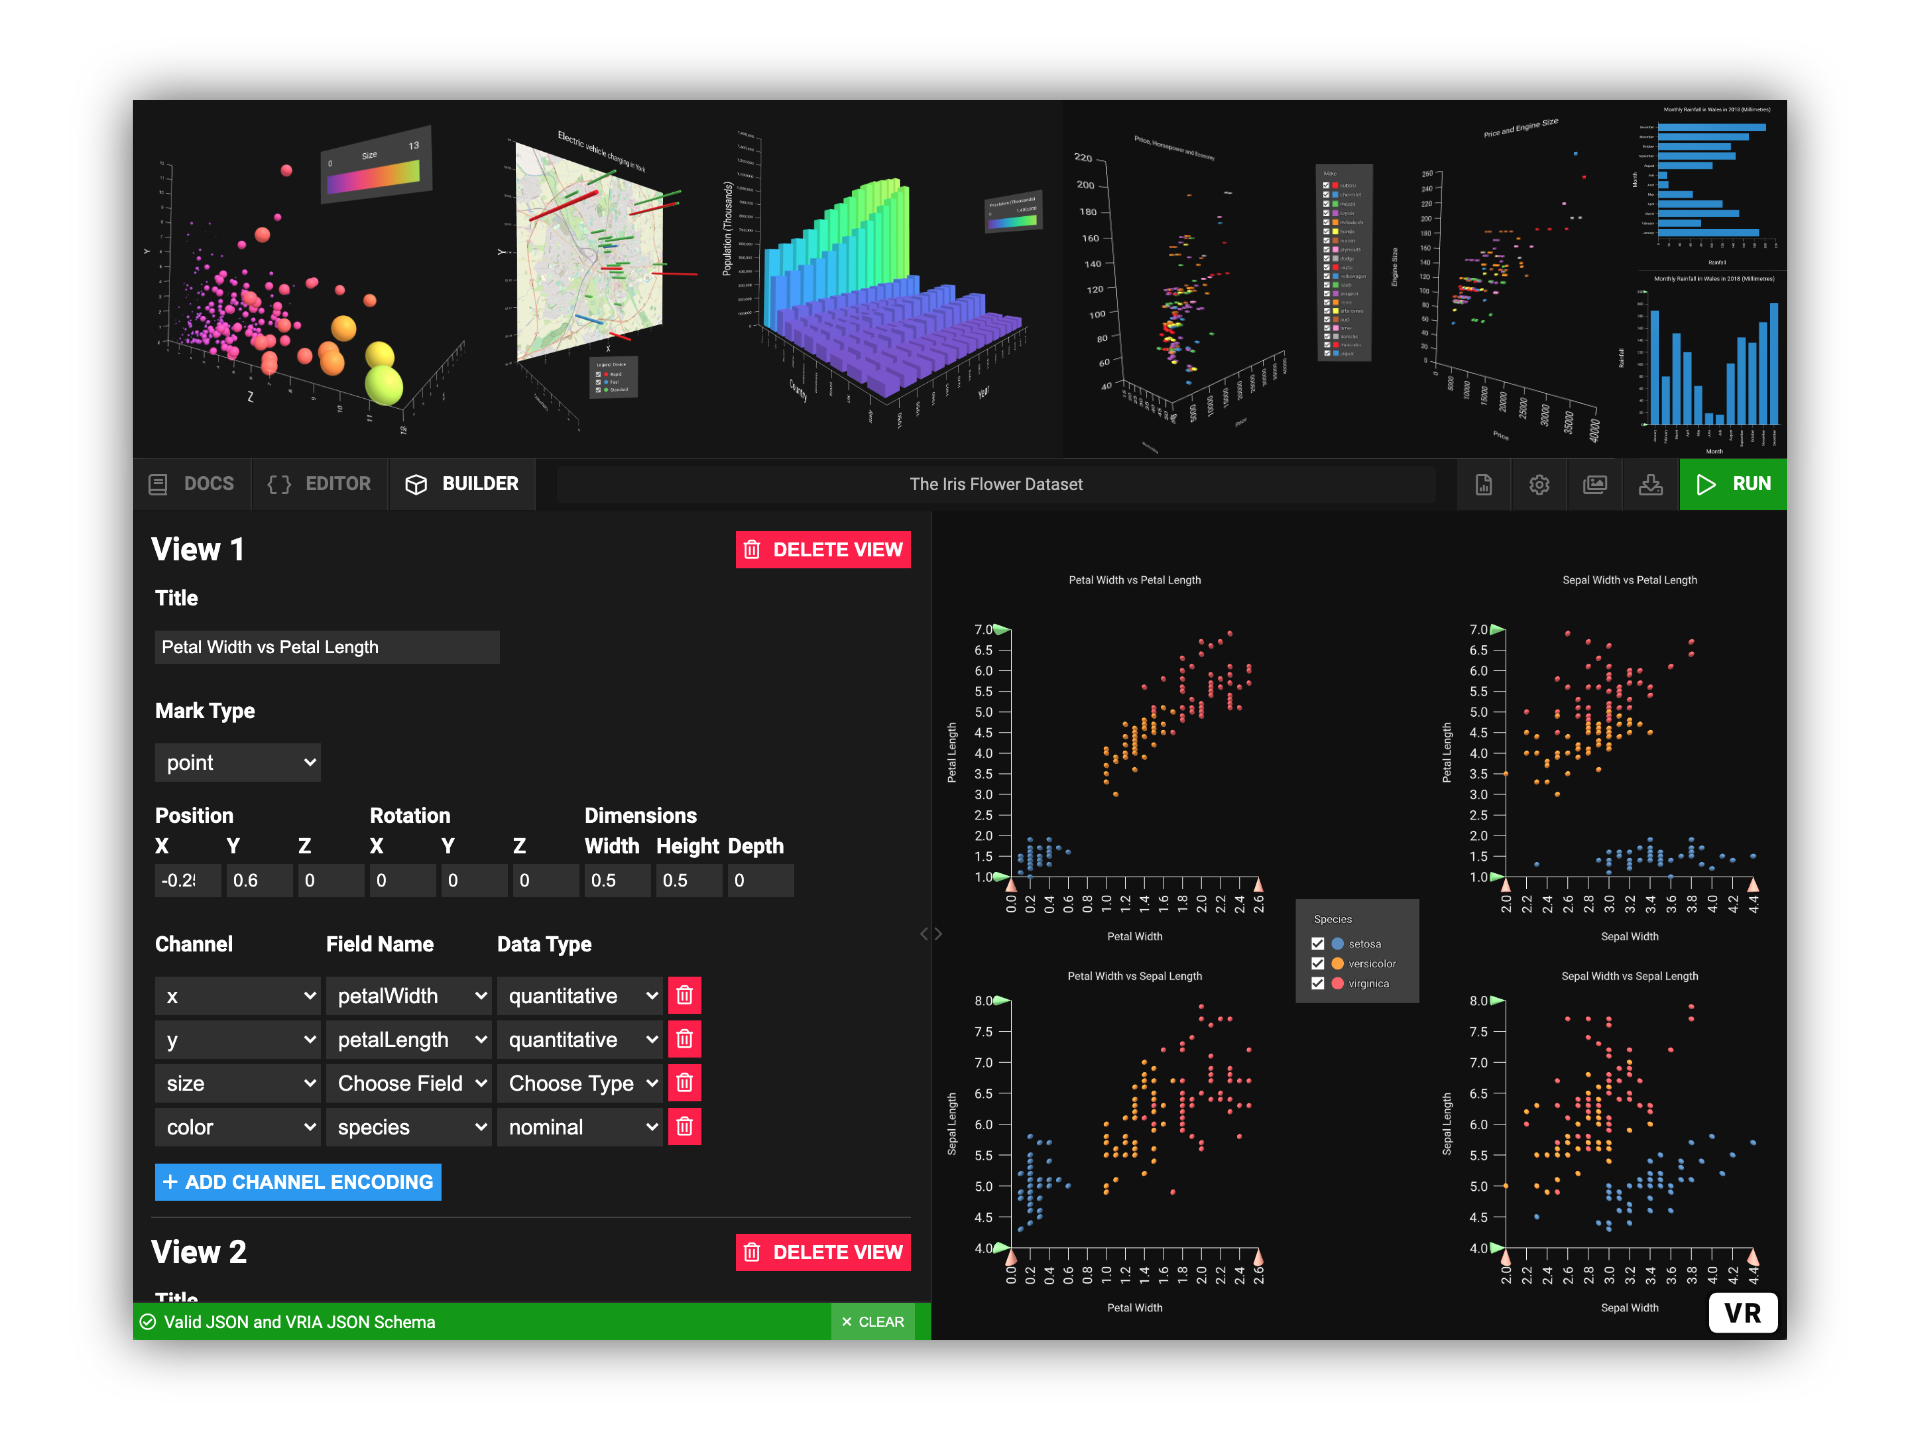
aframe-reactComponent and API - VRIA Builder
- VRIA Boilerplate
- Team
- Publications
- License
VRIA is a Web-based framework for creating Immersive Analytics experiences in virtual and augmented reality. Built with React, A-Frame, and D3, VRIA lets you rapidly create interactive, immersive data visualizations with a declarative grammar described in JSON. Powered by WebXR, the scenes you create with VRIA can be accessed immediately on a growing number of supported devices and browsers. Extra functionality can be added to immersive scenes with VRIA's API.
VRIA visualizations are defined with a declarative grammar described in JSON. VRIA's grammar is similar to those of Vega-Lite and DxR.
Please refer to the VRIA Grammar Definition and/or the VRIA JSON Schema.
VRIA's NodeJS module is separated into three parts:
- The VRIA
aframe-reactcomponent and API. [docs] - The VRIA Builder: An end-to-end tool for learning and rapidly prototyping immersive Web-based visualizations. [docs]
- A boilerplate environment to create your first standalone VRIA application. [docs]
To get started with VRIA, you can experiment with the hosted version of the VRIA Builder online: https://vriajs.github.io/vria
To add VRIA to a new or existing project you will need:
- NodeJS (>= v10.0).
- You will also need to install
reactandreact-domif you haven't already. The easiest way to get started with a new React project is via create-react-app (recommended). - Finally, you will need to include the A-Frame library script in the
<head>of yourindex.htmlfile:
<script src="https://aframe.io/releases/1.0.4/aframe.min.js"></script>You can add VRIA to a new or existing application by installing it with Yarn or NPM:
yarn add vriaor
npm install vriaYou can then include VRIA in your project:
import VRIA from 'vria';If you are using create-react-app you can run either yarn start or npm start to start the development server.
Your app will now be running at localhost:3000.
You can then include VRIA in your project, something like this:
// index.js

import React from 'react';
import ReactDOM from 'react-dom';
import { Scene } from 'aframe-react';
import VRIA from 'vria';

const config = {
  title: 'My first VRIA app',
  data: {
    values: [
      { a: 'A', b: 1 },
      { a: 'B', b: 2 }
    ]
  },
  mark: 'bar',
  encoding: {
    x: { field: 'a', type: 'nominal' },
    y: { field: 'b', type: 'quantitative' }
  }
};

const App = () => (
  <Scene>
    <VRIA config={config} />
  </Scene>
);

ReactDOM.render(<App />, document.getElementById('root'));You can build your app for production to the build/ directory by running either yarn build or npm run build.
The VRIA aframe-react component is an A-Frame entity, wrapped up in a React component. It can be passed A-Frame props (e.g. position and rotation etc.), as well as props to access VRIA API features.
You can include other A-Frame components and assets inside the <Scene> element. Entities can be added with aframe-react's <Entity> component:
<Scene>
  <a-assets timeout='70000'>
    <img src='myimage.jpg' id='myimage' />
  </a-assets>
  <Entity
    primitive='a-image'
    width='1.5'
    height='1.5'
    src='#myimage'
    rotation='-90 -90 0'
    position='0 0 0'
  />
  <VRIA config={config} />
  <Entity environment={{ preset: 'default' }} />
</Scene>
In the above example the config prop is used to load a VRIA vis-config as JSON. The config prop is the only required prop, and all visualization functionality can be acheived with it. See VRIA Grammar.
VRIA exposes a set of props that can be used to integrate a scene with other libraries and user-defined features. For example, additional filters can be added to other features of a multi-variate dataset with user-defined interaction components (e.g. buttons, sliders etc.).
- config
- onConfigParsed
- additionalFilters
- onFilter
- setFilters
- onSelection
- setSelection
- customMarks
- options
required [object]
The config prop contains a VRIA vis-config as JSON and must be supplied when the VRIA component is rendered. See VRIA Grammar for details on how to structure a VRIA vis-config.
optional [function]
The onConfigParsed prop should be passed a function which will be called whenever VRIA compiles a vis-config update. This function will be passed an object containing the following:
| Property | Type | Description |
|---|---|---|
compiledConfig |
object | The compiled VRIA vis-config |
dataset |
object array | The parsed dataset |
domainMap |
Map() | The state of visualization domain filters |
scales |
object array | Scale functions from each VRIA view |
Example usage:
<VRIA
  config={config}
  onConfigParsed={({ compiledConfig, dataset, domainMap, scales }) => {
    // Do something once the vis-config is compiled
  }}
/>optional [object array]
The additionalFilters prop is used to list field names and domains of the dataset that the user would like to filter from the visualization. From this it is possible to create a custom filter component for each of these additional fields. Fields must not already be included in any of the encoding channels in the vis-config. Custom filters can have the following properties:
| Key | Required | Default | Possible Values | Description |
|---|---|---|---|---|
field |
Yes | - | string: field name | A field of the dataset |
type |
Yes | - | string: quantitative | nominal | ordinal | temporal |
Field data type |
zero |
No | false | boolean | Whether the domain should start from zero (quantitative only) |
domain |
No | For quantitative data types: extent [min, max] or [0, max] if zeroed. Other data types: complete set of values |
number array | string array | Set the domain of this field. This sets the filtered state of a field's domain. |
For example, a vis-config already containing the fields horsepower and miles_per_gallon can have top_speed and cylinders added as additional filters:
<VRIA
  config={config}
  additionalFilters={[
    {
      field: 'top_speed',
      type: 'quantitative'
    },
    {
      field: 'cylinders',
      type: 'ordinal',
      domain: [4, 5, 6]
    }
  ]}
/>
Notice how cylinders has a domain specified. This would have the effect of filtering the dataset based on this domain whereas top_speed does not yet have a domain filter applied.
Additional filters are normally specified when a visualization is created so that they may later be filtered with the onFilter callback and setFilters function.
optional [function]
The onFilter prop should be passed a function that will be called whenever a filter is updated in a VRIA visualization or by a user-defined filter that is attached to the setFilters prop.
This function will be passed a Map() containing the current state of all field domains in a VRIA visualization, including any domains that were specified in the additionalFilters prop.
This prop can be used to send the state of VRIA filters across the network in a multi-user environment, or for use in other parts of your application.
| Argument | Type | Description |
|---|---|---|
domainMap |
Map() | Current state of visualization filters by field=>domain. |
Example usage:
<VRIA
  config={config}
  onFilter={(domainMap) => {
    // Do something with the current visualization filter state
  }}
/>optional [Map()]
The setFilters prop should be passed a Map() containing the updated state of all field domains in a VRIA visualization, including any domains that were specified in the additionalFilters prop. The latest filter state can be retrieved from the onFilter prop whenever the filter state changes.
This prop can be used to set the state of VRIA filters received from across the network in a multi-user environment, or to update the visualization filters from elsewhere in your application.
optional [object]
The onSelection prop should be passed a function that will be called whenever a selection is made in a VRIA visualization. The function will be passed an object containing the following properties:
| Property | Type | Description |
|---|---|---|
data |
array | An array of objects containing data points from the selection |
dataMap |
Map() | A mapping of each mark's class name to its respective data point in the selection. |
marks |
array | An array of the class names of each mark in the selection |
This prop can be used to send the state of VRIA selections across the network in a multi-user environment, or for use in other parts of your application.
<VRIA
  config={config}
  onSelection={(selection) => {
    // Do something with the current selection state
  }}
/>optional [object]
The setSelection prop should be passed an object containing details of a selection to be made in a VRIA visualization. It should match the structure of the object received from the onSelection prop.
This prop can be used to set the state of VRIA selections from across the network in a multi-user environment, or to update the visualization selections from elsewhere in your application.
optional [object]
Custom marks can be added to visualizations via the vis-config and customMarks prop. Custom marks are A-Frame entities or models. A custom mark can make use of data from all encoding channels in a vis-config which are accessible to them as props. Here is an example of a custom mark:
const customMark = (props) => (
  <Entity scale={`${props.width} ${props.height} ${props.depth}`}>
    <Entity
      primitive='a-box'
      height='0.6'
      position='0 -0.3 0'
      color={props.color}
    />
    <Entity
      primitive='a-box'
      height='0.4'
      depth='0.6'
      position='0 0.2 0'
      color={props.color}
    />
  </Entity>
);
This example makes use of the dimension and color encoding channels, but every encoding channel is available to use via props. To include this mark in a visualization, the name of the mark should be used in place of the mark type in the vis-config. More than one custom mark can be used at a time inside the customMarks prop object. Here's how the customMarks prop would look with our mark definition above.
<VRIA config={config} customMarks={{ customMark, otherCustomMark }} />optional [object]
The options prop is used to pass overrides for some general VRIA settings:
| Option | Default | Possible Values | Description |
|---|---|---|---|
userHeight |
1.6 | number | The height of the user in the scene in metres |
handedness |
both | string: left | right | both | none |
Which controllers to render |
multiSelect |
false | boolean | Whether to accept single or multiple concurrent mark selections from a user |
chartColor |
#000000 | string | The base color of all chart components |
selectColor |
#00FF00 | string | The color a mark will change to when it is selected by the user |
For example, to change the chartColor to white and selectColor to red:
<VRIA
  config={config}
  options={{
    chartColor: '#FFFFFF',
    selectColor: '#FF0000'
  }}
/>Although VRIA will validate your vis-config at runtime, sometimes you may wish to valid a VRIA vis-config against the VRIA JSON Schema before passing it to VRIA. To do this you can run it through the validator with the validateVisConfig named export:
import { validateVisConfig, schema } from 'vria';
import config from './config';

// Validate a vis-config
console.log(validateVisConfig(config));
This example also shows you how to access the VRIA JSON Schema if you wish to do your own validation.
The VRIA Builder: An end-to-end tool for learning and rapidly prototyping immersive Web-based visualizations. It is available online at: https://vriajs.github.io/vria and as part of this package.
To use the VRIA builder locally, follow these instructions:
- Clone or fork the VRIA Git repository
- Navigate to
builder/ - Run
yarn installornpm install - Run
yarn startornpm start
The builder is now running at localhost:3000
Run yarn build or npm run build to create a production ready build of the VRIA builder to builder/build.
The VRIA Boilerplate is a way to quickly get started with VRIA without starting a new project from scratch. To use the boilerplate application, follow these instructions:
- Clone or fork the VRIA Git repository
- Navigate to
boilerplate/ - Run
yarn installornpm install - Run
yarn startornpm start
The boilerplate example is now running at localhost:3000
Run yarn build or npm run build to create a production ready build of your app to boilerplate/build.
VRIA is in ongoing development by the Visualization, Modeling and Graphics Research Group at Bangor University, UK, led by Peter Butcher and Panagiotis Ritsos.
VRIA: A Web-based Framework for Creating Immersive Analytics Experiences
📃 Journal article available on IEEE Xplore: https://ieeexplore.ieee.org/document/8954824
Published in: IEEE Transactions on Visualization and Computer Graphics (Early Access) - Presented virtually at IEEE VIS 2020.
@ARTICLE{8954824,
  author={P. W. S. {Butcher} and N. W. {John} and P. D. {Ritsos}},
  journal={IEEE Transactions on Visualization and Computer Graphics},
  title={VRIA: A Web-based Framework for Creating Immersive Analytics Experiences},
  year={2020},
  volume={},
  number={},
  pages={1-1},
}MIT © Copyright 2020 Peter W. S. Butcher, Nigel W. John and Panagiotis D. Ritsos - University of Chester, UK (Visualization, Interaction and Graphics Research Group) and Bangor University, UK (Visualization, Modeling and Graphics Research Group) - All rights reserved